A simple chain-oiler
|
|
I found on TM - https://www.talkmorgan.com/ubbthreads.php/topics/837992/re-super-three-chain-drive-conversion#Post837992 – a question about chain-oilers and
thought to write about my experiments with it. When having a chain conversion
kit, as for instance sold by Phill Bleazey, a chain
oiler is essential. Besides good alignment of the
Bevel-box with the rear-wheel - another article to be coming - a not good
oiled chain is the main cause of noise with a chain. When you do not oil the chain
regularly, the rollers in the chain will wear out which gives metal to metal
noise. The most simple method is buying
a brush on the internet and put some oil on it and brush the chain with oil. On amazon : Bike Chain Cleaning
Brush € 7 for 2 or 4. Advised is to use around 80-SAE
but I like to use 250 severe gear oil because I have it on board for my
Bevel-Box lubrication and it works perfect too. Every time after topping up the
fuel tank you lift the car so your rear wheel can freely turn and use the
special brush to lubricate the chain. Not more than 15 minutes work. Actually in normal conditions –
no snow, no rain, no mud – this is enough for 600km. You will get some splashed oil on
your rear-wheel mud-protector but when you have to work on the rear wheel you
can clean this at that moment. But when you do not want to jack
up the car or are very often - like us - on the road for longer trips a
chain-oiler is an easier solution. I tried several of them and was
sometimes partly pleased especially with the most cheapest one I could find. You can spend a lot of money on
automatic and GPS regulated oil-sequences, but you spend a lot of money which
is not necessary. For me a hand pressure system
works fine. Every time I am at a fuel station
I open the trunk, turn ½ a turn or more on my pressure tank/ cup and a
¼ back. That’s enough. Remember that every extra system
will create also extra failures and will need extra care and maintenance. So keep it simple, but not
stupid. When I have some time I look
under the ‘car’ - I like ‘Trike’ for a M3W as a better word - to check
the lubrication of the chain. And when I do maintenance – and
for me this is the main reason for having a M3W - I put a carton under the
rear-wheel and use some air pressure to clean the tube and the chain oiler
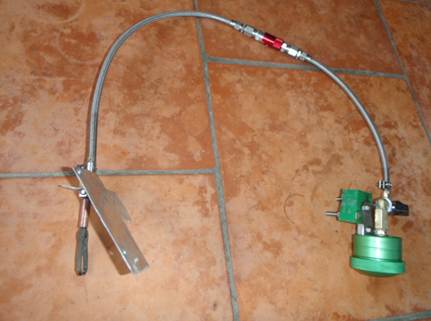
from mud. I experimented for a while with
the nice Loobman system -
https://www.loobman.co.uk/ for € 36 - but after a while I did not
like his oil pressure system by a button, because it did not work well. It needed actually to be open for
quite a while, so I used a plastic ribbon to keep the button down which gave
then too much oil. Too much oil is not a problem for
the chain but it is for the environment. But my main concern was that when
you contact Denis Loobman for spare parts he never
answers. So very bad after-sales services. The idea of just a simple tank
and oil pressure button of the Loobman inspired me
to have a look at the so called ‘NEMO’ system. There are a lot of complains
about it. It keeps leaking is the main
complaint, but in most cases that is due to not understanding the system. When the little tank is filled
you have to turn it 2 rounds down and then ½ a turn back to create
under-pressure. The under-pressure you create in
that case in the top of the tank will stop the oil for running further. Like
a bird watering system in your garden. It is also important to have the
whole system well air-tight installed so no extra air bubble can go up. To get the tube good air tight I
uses Tefgel and Teflon-tape in the fittings ⅛
“ BSP and used a reinforced mantle AN-3 break-line hose. Thick oil will help also with
this, which is another reason I use again the 250 grade severe gear. Using it and simply fill this
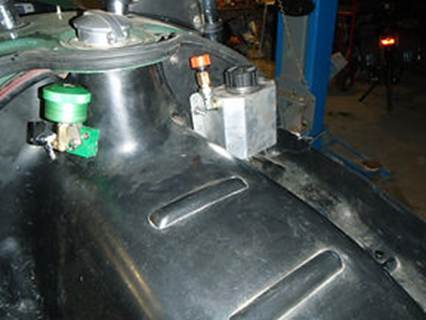
little tank I had to install the tank under the ‘boot-lid’ attached on the
‘Boot inner tray’ so I could use it easily when opening the ‘boot-lid’. But with this solution you have a
problem. When you have to take out the
‘Boot inner tray’ – which is for me quite often - you have to disconnect the
tube. I used an ‘AN3 Quick Release
Motorcycle Dry Break’ to easily disconnect the hose.
In case of a longer stay in the
garage, I installed a small ⅛ BSP ball-valve behind the little cup/
tank so I can close it. When checking or filling the cup
I use the ball valve too. And in case I should have a
leaking device like others are complaining about, this ball-valve will help
me. There are several solutions to
get the oil at the chain. Most common is a small tube
directed to one side of the chain near the rear-wheel sprocket. I tried it but was not convinced. I opted for the Loobman because of the little gaff/nozzle he uses which
forks at both sides of the rear-wheel sprocket. Cleverly using a tiny tie-rib to
direct the oil aside. But after losing one of these
gaffs which is normal with the rubbish on the roads I could not get a spare
new one. I found a gaff/nozzle at
‘Pro-oiler’. This one works different and just
drips the oil slowly at both sides of the sprocket. Centrifugal force will direct the
oil around and in the chain. Which is helped by the reason that behind the
sprocket teeth the sprocket is thinner so at first the oil stays at that
ridge. The gaff/nozzle is delivered with
a sturdy but flexible rubber hose with ID 4mm which fits nicely on a barb
fitting. To get the rubber more fixed I
used a small piece of standard copper pipe to cover it, but it still can move
enough for installing it around the sprocket teeth. I made myself a support for the
gaff-connection on the swing arm with piece of 2mm aluminum plate. I bended an outer part of this 2
mm aluminum plate to make a hole and fitting for that barb fitting male at
one side and a female ¼ BSP at the other side of the aluminum. One of the barbs is connected
with the hose the other with the rubber of the gaff/nozzle. To get more grip on the aluminum
plate I used here the ¼ BSP instead of a ⅛ BSP. The aluminum plate is fixed with
two M5 Alan-bolts in the existing holes for the Mud guard. My swing arm has 2 rivet-nuts at
each side so also two holes in the mud-guard bracket to attach the mud-guard.
I drilled the front mud-guard hole of 5mm to the size of the Alan head. I first install the chain-oiler
plate on the swing arm and then the Mud-guard so the front hole can slide
over the Alan-bolt head. I fix the aft Alan-bolt of the
Mud-guard bracket and when I want – but never do – I can use a little extra
washer to fix the front again. Actually you need only one bolt
to fix the mud-guard bracket to the swing arm as shown in the
‘M3W-Parts-Book-V5.2’. Estimated costs ‘AN3 Quick Release Motorcycle Dry
Break’ on Amazon € 22 5 feet ‘AN3 PTFE Hose with
Stainless Steel Braiding’ on Amazon € 26 AN3 to ⅛” NPT connector to
the dry-break
€
11 ⅛" BSP Hex
Nipple; ⅛" BSP Hex Coupling, ⅛" Female
& Male BSP 90 Degree Elbow 4mm x ⅛” BSP Male Barb Connector € 7 ⅛" Mini Brass Ball
Valve ⅛" BSP Male to
Female € 11 I found a copy of the Nemo tank
on Ali-Express for
€ 12 I bought some extra barb fittings
¼ BSP for a connection to a gaff which is actually the oiler on both sprocket
sides. For the gaff system I bought the
small gaff from Pro-oiler. The mini-nozzle for € 18 The great thing of Pro-oiler is
that you can buy spare parts like the nozzle separately
Total
€ 107 Worktime : a couple of hours. Some extra chain
information Working on our Bevel-box project,
after more than 12000 km usage I dissembled the whole chain-drive conversion
. Gave it a serious check on chain
and sprockets but could not find any reason why to renew it so installed the
old stuff again. Tsubaki Advises to change the chain with
an 1,5% elongation Measured over 6 rollers L1 Inside 6 rollers L2 Outside 6 rollers L = ( L1 + L:2 ) /2 = 95,25 mm 1,5% elongation = 96,68 mm Tsubaki “When the chain speed is fast and
the load varies Roller chain may vibrate if the natural vibration frequency
of the chain, shock frequency of the driven machine, or chordal action of the chain
(vertical pulsation of the chain due to the polygon effect) synchronize. In
this event, use a guide shoe (made of NBR or ultra-high polymer polyethylene)
or other device to stop the
vibration. You can take a gap of 2 to 4 mm
between chain and contact surface.” à
This is a noise related issue, and because I am not disturbed by chain noise
much it has not a big priority for me. Because of the fun, I will
experiment with some simple and easily to be installed solutions. Tsubaki “Drip lubrication Using a simple case, this method drips
oil supplied from an oil cup For one strand of chain, drip
about 5 to 20 drops of oil each minute. Drip more oil on higher speed
chains.” à
In my experience I think this is a little too much. Tsubaki When controlling a well
lubricated chain When the chain is stationary, the
chain surface will generally appear dirty from wear dust if lubrication is
unsatisfactory. This is especially the case between the link plates. Which means that a chain should
be reasonable clean. A Good oiler system cleans the chain too. Comment from TM
reader "O" or better
"X" link chains are another consideration. They refer to the shape
of grease seals fitting inside the chain plates and rollers front and back in
order to retain grease. There still needs to be
lubrication between rollers and sprockets of course. Also of importance is regular
cleaning of excess lubrication from chain which otherwise amalgamates with
road dirt then acting like a grinding paste. |
|